I’m sure that many of you will think that I’m mad when you read this, but I salivate at the thought of kale. I love them so much that I grow them in my garden. Unfortunately, my kale supply can’t keep up with demand so if I long for that delicious bitter goodness, I buy bunches of kale until my kale plants replenish themselves. I may have to find some extra room in my garden to grow more! I use only the leaves as the stems are quite tough.
There are many varieties of kale. The two varieties that I see most of in Melbourne and that I grow in my own garden are the curly leaf and the flat leaf Tuscan variety.
Kale is very high in vitamins A, C and K. (Note: Vitamin K plays a role in blood clotting, so high levels of vitamin K in your system can interact with blood thinners, such as warfarin. It’s a good idea to speak to your health care provider about the safety of regularly consuming kale if you suffer from clotting disorders or if you take anti-coagulant medications.)
Kale also contains iron, calcium, folic acid, and other vitamins and minerals.
Note: If you have issues relating to your thyroid, it’s best to cook kale (rather than eat them in their raw state) and eat in moderation as kale (along with other members of the brassica family of plants such as cabbage, broccoli and cauliflower) can interact with thyroid function.
One of my favourite kale recipes is Kale & Almond Crackers. It’s a long process to make these as I dehydrate them in my oven, but it’s well worth the effort. I’m sure it’s possible to bake them at a higher temperature to speed up the process of drying the crackers (I haven’t baked them before so you’ll need to play around with oven temperatures and times if you decide to bake them), but the flavour will likely be different. Dehydrating these crackers will keep their natural kale flavour as well as more of the nutrients. I have used both the curly leaf and the flat leaf variety in this recipe and both work well.
Kale & Almond Crackers Recipe.
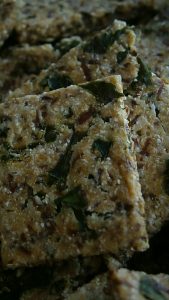
(Vegan, gluten free, dairy free, egg free, soy free, sugar free.)
Ingredients:
1 bunch kale
1 1/2 cups almond meal
1/2 cup coconut flour
1/2 cup savoury yeast (nutritional yeast)
2/3 cup ground linseeds (flaxseeds)
2/3 cup filtered water
Himalayan salt & pepper to taste
Add ground linseeds and water in a bowl. Mix and set aside.
In a separate large bowl, place the almond meal, coconut flour, savoury yeast, salt and pepper and mix. Set bowl aside.
Discard the kale ribs and wash the leaves. Remove as much water as possible from the kale (I use a salad spinner for this). Place kale leaves in a food processor and process until chopped up finely. You may need to do this in batches depending on the size of your food processor.
Add the chopped kale to the bowl containing the dry ingredients and mix.
Add the linseed/water mixture to the kale mix. Mix using your hands until well combined. Divide the mixture in half.
Tear 3 pieces of baking paper so that they’re the same size as the 2 large oven trays that you’ll be using later. (The 3rd piece of baking paper will be used to assist with the rolling.)
Place 1 sheet of baking paper on a bench top. Place half of the kale mix in the centre of the baking paper and slightly flatten. Place the spare baking sheet over the flattened kale mix. Roll out the kale mix using a rolling pin until mixture is very thin (approx 1-2mm). Then peel off the top baking sheet and, using a pizza roller/cutter or knife, score into strips and then from the next side, score into strips so you should have small squares. I usually do them so that the squares are about 3cm in size.
Carefully slide the prepared squares (keeping the baking paper underneath) onto a large oven tray and place in a pre-heated oven at 50 degrees celsius. Prepare the second batch the same way and place in the oven.
Dehydrate in the oven for approx 4 hours. Then turn over and peel off the baking sheet. Dehydrate for a further 4 hours or until mix is totally dry (should be crunchy).
Once cooled, snap into square pieces.
Store in an airtight container. Crackers should keep for a couple of weeks.
Meal Planning Made Simple: